

How To Backfill An Above Ground Pool

You lot're building your own inground pond pool and now it's time to start backfilling effectually the walls and braces. Your inground pool kit should be completely assembled and your physical collar or footing is already poured around the outside of your pool – generally 8″ to 10″ up all around the frame work of the pool. Yous may have already installed the pool liner and have filled the puddle with water, although this can be done after you backfill around the pool walls.
Pace one: Swimming Puddle Backfill Material
When you dug out your hole for your swimming pool we had you separate the material you lot dug out; a pile with your grass, a pile of the superlative soil and the remaining material that may be useable for backfill material. If that textile is a gravely mix that seems compactable – yous can utilize that. If this third pile has many big rocks, or is a clay based textile or cherry-red pan, or any material that retains h2o, you lot should avert using this as backfill against your inground pool walls.
It's expensive to truck out bad fill up, and truck in gravel, but practiced backfill textile is important against the pool walls and equally support for your pool deck. If y'all do need to bring in more than suitable backfill material you desire a skilful gravely mix or only obviously gravel or whatever compactable material. Your local sand and gravel yard can propose you of the all-time choice in your area.
Step two: Suit for the Heavy Equipment
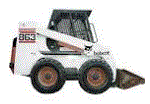 With the proper backfill fabric onsite, nosotros are ready to begin the procedure of backfilling our inground pool. You could use a shovels and several workers, simply it's probably easier, faster and cheaper to bring in a Skid Steer loader, Bucket loader or a Runway Hoe for this part of your DIY inground puddle projection.
Footstep 3: Backfill – Tamp – Backfill – Tamp
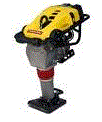 In this phase of our DIY pool projection, we will place our fill cloth into the trench around the pool, in phases – all the style upward to the top of the wall. Beginning, push in nigh 1 ft of your material all around the pool. And so meaty this initial layer, using either a gas-powered compactor or a heavy hand tamper. You'll find both to be a lot of work, but the gas-powered tamper (shown right) will complete the job more speedily.
Go all the style effectually the puddle – all the material we simply put in must exist compacted fully. Subsequently the outset layer is done, push button in your next layer of material and compact it in the aforementioned manner every bit the beginning. Continue in this style, 1 foot at a time, until y'all come up within a foot of the meridian of your pool wall.
Stride 4: Concluding Layer of Gravel
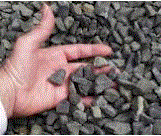 For the last layer we want to use the all-time backfill material. I always propose using a viii-12 inches of bluestone gravel for the height layer. This volition give a good foundation to support your physical pool deck. Put the top layer of gravel in a little higher than your wall and compact it extremely well. This is what our patio volition sit on top of and then we desire to take actress time on this layer to prevent cracking or settling of our puddle decking.
Step 5: Soak Down the Backfill
We have all our material in identify and compacted our next stride will be to soak the whole area thoroughly, for hours. Placing sprinklers around the pool and letting them run for ii or iii hours unremarkably does the trick. After a super-soaking, permit the ground surrounding your pool dry up; this usually takes a twenty-four hours or two. You will notice that even though you lot spent all that time compacting your layers, the area around the puddle volition have settled a few inches. This is good and exactly what nosotros were hoping for. If desired, later a few days, you tin repeat the process, to ensure that the layers are as compact as they tin can exist.
Stride six: Ane More than Backfill Layer
1 more layer of gravel or stone dust tin can exist placed on top – again to bring it up to the the level of the pool. Utilise more material upwards against the pool walls, because as you tamp this final layer, y'all will grade it, to slope information technology away from the puddle. The slope should be about 1/four″ for every human foot of puddle deck. If you lot are installing a iv foot wide pool deck, the outer border should exist ane inch lower than the edge confronting the pool. No need to be exact, any difference will be fabricated upward for equally the concrete deck is poured.
And that's it! Backfilling your inground pool is one of the happier phases in building your own inground pool. You lot tin now really see information technology meeting, and the excitement will fill up the house. Very few steps in your DIY inground puddle projection remain. When you backfill your pool using our methods described above, yous can quickly schedule the concrete truck to make another visit and have your pool deck poured, without having to await for the surrounding footing to settle.

Larry Weinberg
SPP Pool Adept
Source: https://blog.intheswim.com/how-to-backfill-your-inground-swimming-pool/
0 Response to "How To Backfill An Above Ground Pool"
Post a Comment